
Apple had released the first public beta of iOS 12 on June 26, 2018 for compatible iPhone, iPad and iPod touch models, enabling users to test the software ahead of its official release in September 2018. iOS 12 is compatible with iPhone X, 8 Plus, 8, 7 Plus, 7, 6s Plus, 6s, 6 Plus, 6, SE and 5s. When it comes to iPad, it is compatible with iPad Pro 12.9-inch 2nd generation, 1st generation, iPad Pro 10.5-inch, iPad Pro 9.7-inch, iPad Air 2, Air, iPad 5th generation, iPad mini 4, mini 3 and mini 2. It will also work with iPod touch 6th generation in case you have one. So let us quickly go through the steps required to install iOS 12 beta on your iPhone or iPad.
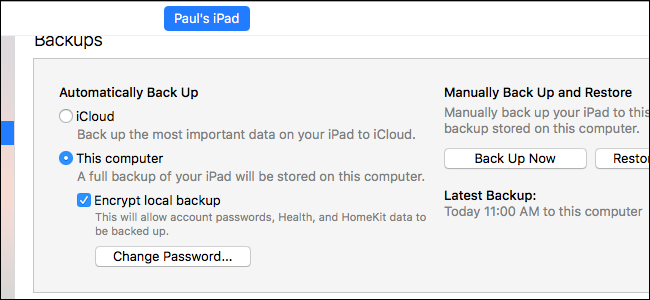
Step 1: Back Up Your iPhone or iPad with iTunes
You should totally back up your data to a local machine (laptop or desktop) so that you do not regret anything later if the update goes wrong and you end up losing all your data. Hence, always back up your iPhone or iPad with iTunes locally. You can also back up with iCloud but it will take a very long time and you’ll also have to purchase extra space to back up all your data. Also, if you want to wipe your phone and go back to iOS 11, the process will take a few minutes if you have a local backup with iTunes.
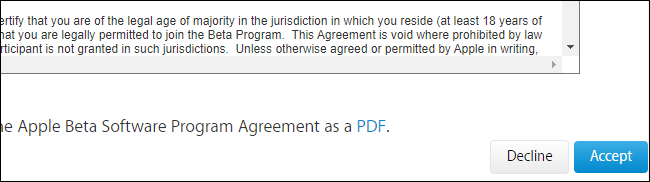
Step 2: Sign Up For iOS 12 Beta
Once you have taken backup of your compatible iOS device, you’ll need to sign up for an Apple Beta Software Program account. It is very simple to sign up; just head over to the website, sign in with your Apple ID and click “Accept” to accept the agreement and confirm that you want to join the program. However, do not worry as signing up will not automatically update all your devices to iOS beta software. This will just make you eligible to upgrade to beta software. Follow the instructions below to get the actual beta.
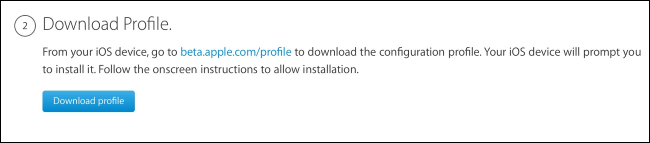
Step 3: Update Configuration Profile
It is time to update to iOS 12 beta. You will get the update via OTA and hence you should keep your device fully charged or keep it plugged to a charger. Now, open Safari on your iPhone or iPad and visit https://beta.apple.com/profile. Log into the same Apple account you linked to the beta testing program, if prompted. Then, scroll down, look for the step “Download Profile” and then tap the “Download profile” button. Now, tap “Install” in the upper right corner. After it gets installed, you’ll be prompted to restart your iPhone or iPad. Tap “Restart” to proceed further.
Note: iOS 12 beta is not installed on your device yet, you have just updated the profile on your iPhone or iPad so that you are eligible for the OTA update.
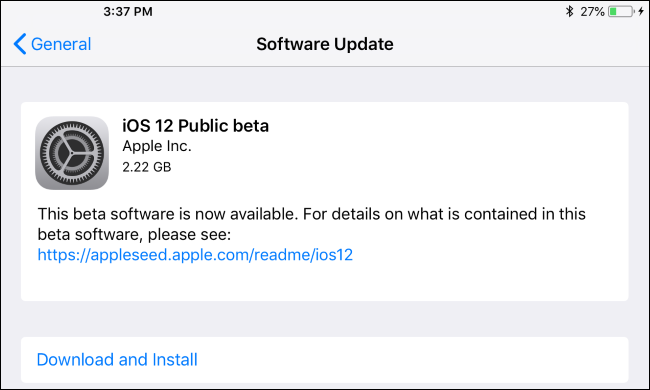
Step 4: Apply the Update
After restarting your device, go to Settings > General > Software Update. Now, you’ll see an entry for “iOS 12 Public beta.” Tap the “Download and Install” link. It will take a good amount of time to update the device, so plug in your iPhone or iPad to not see any battery low prompts.
Step 5: Complete the Process
After finishing the update, the lock screen will pop up on your iPhone or iPad. Enter your PIN to get started. Now, you’ll get prompted to accept some agreements along with several data collection programs like error reporting to Apple and app developers since the whole point of beta software is for curious iOS users to try all features before they reach the public in a stable release. Thus, every error report will help Apple to make iOS 12 more stable. You can send your report via the Feedback App on your iPhone or iPad.

This brings us to the end of “How to install iOS 12 beta on iPhone or iPad”. Follow all the steps properly to try out the latest iOS 12 beta before its public release. Just do not forget to backup your device locally with iTunes so that you can easily go back to iOS 11 in case anything goes wrong. Let us know your thoughts on iOS 12 public beta in the comments section below. Also, tell us about your best iOS 12 features.


