")
Legal or illegal, call recording is a nifty little feature to have on your smartphone and unfortunately, only a handful of manufacturers include the option to do so within their OS. This leaves the rest of the users to rely on third-party apps. Though it is understandable why such laws exist against the feature in the first place, I for one would want the functionality. This allows users to record calls so that they don’t forget any important details for future references like work, about any event, etc.
As I mentioned above there are tons and tons of apps available within the PlayStore that can perform such task but most of them are full of ads and with all the privacy issues and my personal data at risk, I can’t blindly go for an app that I scroll upon. When I was looking at the better alternatives since my Nokia 7 Plus doesn’t have a default call recording option, Truecaller made an announcement that it is updating its app with default call recording functionality. Truecaller doesn’t need any new introduction, it is one of the best caller id app in the world and this article, we will show you how you can record calls on Truecaller. Let’s get started.
While Truecaller app is available for both Android and iOS, the feature is currently available only for Android and the feature only supports phones that are running Android 8.0 and above. However, it is unsupported on Pixel, Nexus series phones for reasons only known to Truecaller makers.
According to Truecaller, the official list of supported devices includes Samsung Galaxy S8, S9, S9+, Huawei P10 Plus, Xiaomi Redmi Note 3, Oppo F1s, Oppo A57, Vivo 1713, LG G5, Samsung J7, Samsung J2, Samsung J7 MAX, Wileyfox Swift 2, Intex Aqua Lions X1+, OnePlus 2, however, we believe most Android phones running Android Oreo and above would support this feature. With that in mind, let’s get started.
Here’s how to record calls on android using TrueCaller:
- First of all, you need to have Truecaller app, for that, you will have to download it from the PlayStore. Download: Truecaller. Though the app is free, it does have a Pro section with in-app purchases. The Pro section often has discounts, so better keep an eye out for any deals.
- Once you have downloaded the app, open it. Now for the next step, either create an account or sign in with the existing Facebook account. The sign-in is required as all your data will be present under one roof. Just to save yourself from all the account creating job, simply log in through Facebook.
- Now that you are finished with all prerequisites, now let’s discuss on how you can record calls. Firstly, tap on the hamburger icon present on the left side top.
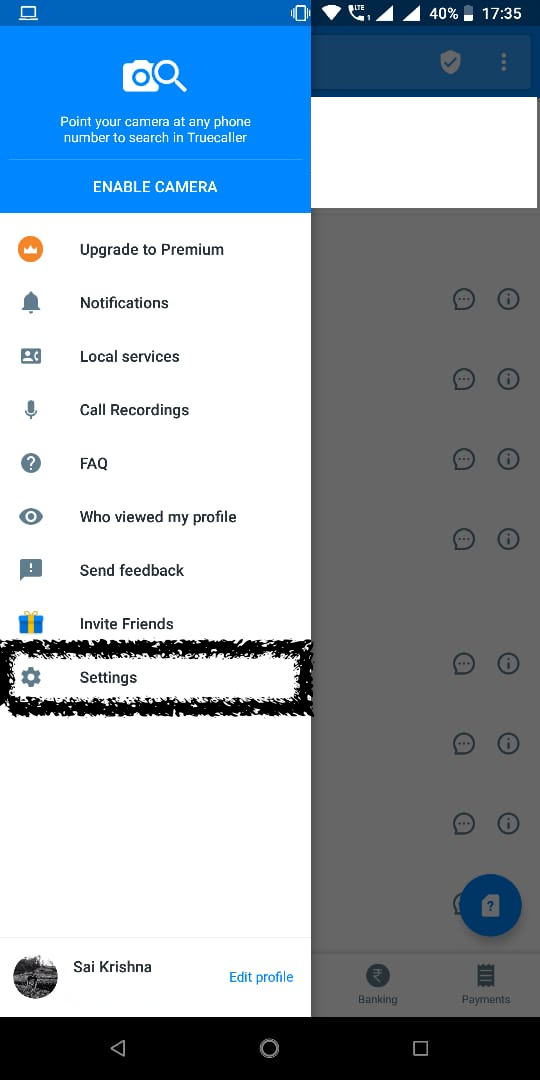
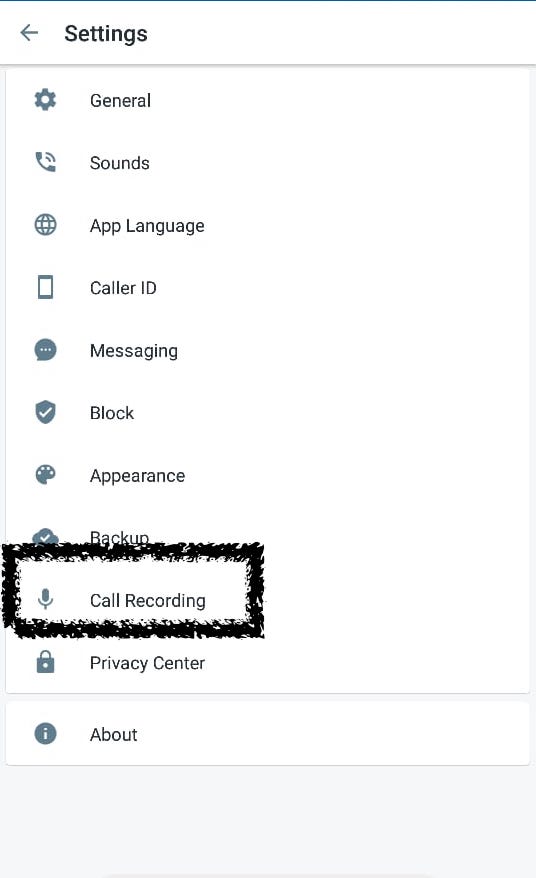
- There you will see a variety of options, but tap on the settings option and then tap on the ‘call recording’ option which is the third one from the bottom.
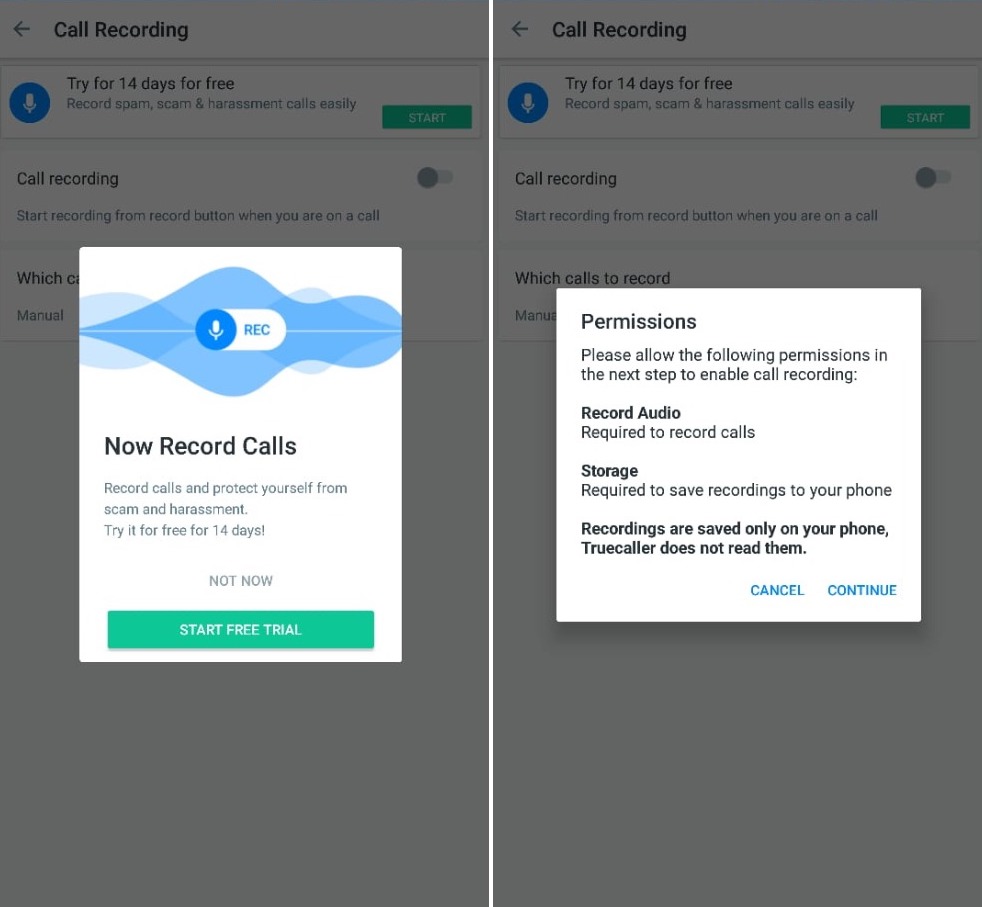
- At this point, Truecaller will notify you that this feature is paid, but gives you 14 days’ trial where you can use the feature for free in the mentioned 14 day period, after which you will have to subscribe if you wish to continue it.
- Tap on the ‘start’ button to start the 14-day trial period and now Truecaller will ask you certain permissions which you will have to grant if you want the app to record the calls. Once you grant these permissions, you are now ready to record calls. Don’t worry, the app will just ask your for microphone and storage permissions; one is to record calls and the second is to store the recordings.
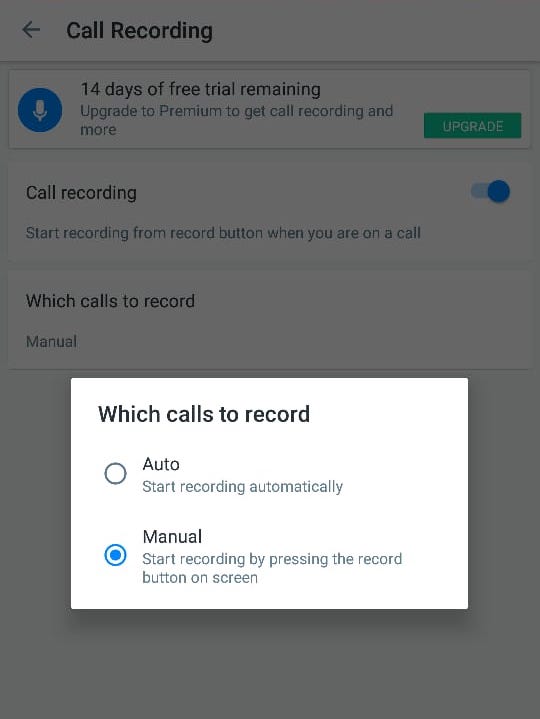
- After granting permissions, now flick the button to enable call recording function. There are two options; one to record selective calls manually and the another is to record automatically for all calls.
- Now to listen to call recordings, you can find all your call records under the Call Recordings” in the hamburger menu section. You can choose to listen to them or delete them when you are done. Since all the recordings are placed in a single location, you don’t have to search for them.
- That’s it, this is how simple the process of call recording is on Truecaller.
I’ve personally tested this feature on my Nokia 7 Plus and it works extremely well and in fact, we find the call recording on Truecaller better than most of the apps we were using before Truecaller pulled plugs on the call recording. As mentioned above, the feature is not free, so once the trial period ends, you can pay Rs. 49 per month to keep using the feature. Considering the functionality it offers, we don’t think the company is asking for much.
Conclusion: As you can see from the mentioned method, call recording on Truecaller is extremely flawless and works brilliantly. The recording quality is also so crisp and clear. Truecaller also mentioned that all the call recordings are stored locally and no one except you will have access to them, so you don’t have to worry about your privacy.
Though the list of supported devices is short, digging a little deep helped in knowing that it will work regardless and the functionality remained the same. Do try out the feature and let us know how helpful and functional this feature is for you. The article is to help you record calls hoping that you have full consent of the other person on call and we don’t encourage recording calls without full disclosure. Do try out this feature on Truecaller and let us know how your experience was.


